Creating and editing projects
Create a project
You can create a new project with the button ‘NEW PROJECT’ in the ‘Welcome’ and ‘Projects’ sections. Write the name of your project, and add roles if you wish to. Adding roles is optional.
To add them write the name of the role and click the button ‘ADD’. You can add as many roles as you want. You’ll also be able to add new roles after the project is created.
Click ‘CREATE’ to create your new project.
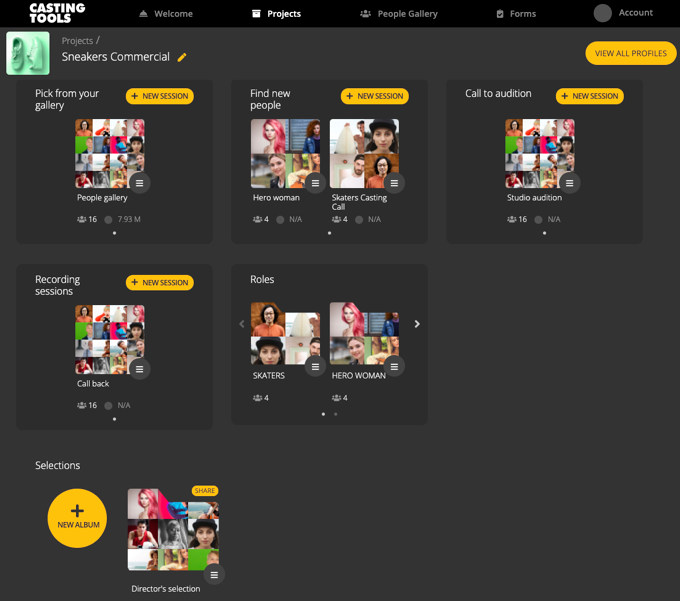
Project dashboard
When you enter a project you’ll be taken to the Project dashboard. Here you will have access to all the folders that integrate the project: its work sessions and its albums.
From the ‘VIEW ALL PROFILES’ button at the top right of project dashboard, you have access to all the profiles in the same place to have a comprehensive overview of the people that are taking part in the project.
Edit project
To edit the project, click the ‘Edit project’ button ().
From here you can add/edit the project picture, edit the name of the project, add and delete roles, deactivate the project, and delete the project.
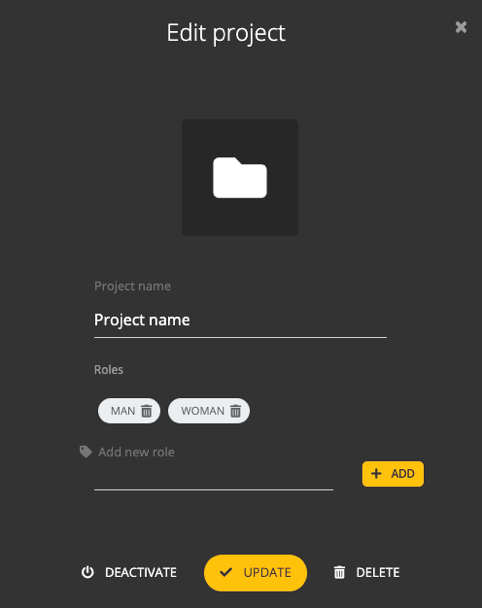
Manage roles
Roles are a way of organizing your profiles by characters. You can create them when first creating the project, or add them later through the ‘Edit project’ button (). In ‘Edit project’ you will also be able to delete roles.
Learn more about roles.
You can create a new project with the button ‘NEW PROJECT’ in the ‘Welcome’ and ‘Projects’ sections. Write the name of your project, and add roles if you wish to. Adding roles is optional.
To add them write the name of the role and click the button ‘ADD’. You can add as many roles as you want. You’ll also be able to add new roles after the project is created.
Click ‘CREATE’ to create your new project.
Project dashboard
When you enter a project you’ll be taken to the Project dashboard. Here you will have access to all the folders that integrate the project: its work sessions and its albums.
From the ‘VIEW ALL PROFILES’ button at the top right of project dashboard, you have access to all the profiles in the same place to have a comprehensive overview of the people that are taking part in the project.
Edit project
To edit the project, click the ‘Edit project’ button ().
From here you can add/edit the project picture, edit the name of the project, add and delete roles, deactivate the project, and delete the project.
Manage roles
Roles are a way of organizing your profiles by characters. You can create them when first creating the project, or add them later through the ‘Edit project’ button (). In ‘Edit project’ you will also be able to delete roles.
Learn more about roles.